Introduction
The facelifted EK Civic brought subtle yet meaningful changes to the exterior styling, making it more refined and aggressive. Many Honda fans on forums like Honda-Tech have documented their experiences upgrading their pre-facelift Civic models. If you’re planning to follow in their footsteps, understanding the right Honda Tech EK Civic facelift parts and procedures is essential for a smooth transformation.
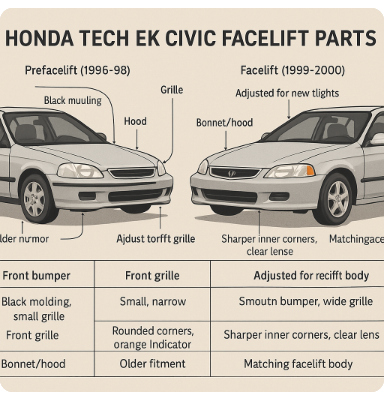
Understanding the Difference: Facelift vs. Pre-Facelift
The pre-facelift EK Civic (1996–1998) featured a more classic front-end design, with simpler bumpers and rounded headlights. On the other hand, the facelift version (1999–2000) introduced sharper headlights, a larger grille, and a redesigned bumper that provided a sportier appearance. These changes were not just cosmetic but also required different mounting points and structural alignments.
| Feature | Pre-Facelift (1996–1998) | Facelift (1999–2000) |
|---|---|---|
| Headlights | Rounded corners, orange lens | Sharper inner corners, clear lens |
| Front Grille | Narrow, rectangular | Wider and integrated into bumper |
| Bumper | With black trim lines | Smooth, cleaner look |
| Bonnet/Hood | Slightly different profile | Raised to meet new headlights |
| Front Fenders | More rounded edge | Angled edge matching new lights |
These differences mean that simply replacing one or two parts won’t be enough. You need a complete set of Honda Tech EK Civic facelift parts to achieve the correct fitment and look.
Required Honda Tech EK Civic Facelift Parts
To complete the facelift conversion, the following parts are absolutely necessary:
- Front Bumper (1999–2000 style): The design is sleeker, and it accommodates the facelift grille.
- Grille: The facelift grille is wider and shaped differently to match the new headlights and bumper.
- Headlights: These are sharper and have a more modern appearance compared to the older ones.
- Bonnet (Hood): Slight changes in shape allow it to align with the new headlights and grille.
- Front Fenders: They must match the shape and alignment of the facelift lights and bumper.
- Radiator Support (optional but recommended): It helps ensure proper alignment of all the front-end components.
These are the main components that make up the Honda Tech EK Civic facelift parts set.
Optional Enhancements
While the core parts are enough for a successful conversion, some additional upgrades can enhance the overall look and feel:
- Fog lights: Many facelift bumpers come with fog light slots, giving your Civic a more aggressive touch.
- Trim Pieces and Emblems: To maintain an OEM appearance, replace trim and badges with facelift versions.
- Paint Matching: For a professional finish, get all new panels color-matched to your existing paint or consider a full respray.
Step-by-Step Conversion Process
1. Remove the Existing Pre-Facelift Parts
Start by carefully removing your original bumper, headlights, grille, hood, and fenders. This step requires patience to avoid damaging your existing hardware or mounting points.
2. Test-Fit the Facelift Parts
Before committing to final installation, test-fit each component. Start with the radiator support (if changing), then install the fenders, hood, headlights, grille, and bumper to make sure everything aligns.
3. Adjustments and Alignment
Minor modifications may be needed. For example, holes might need to be drilled or brackets slightly bent. Ensure that gaps between parts are consistent for a factory look.
4. Paint and Final Assembly
Once you’re satisfied with the fitment, send the panels for paint (if not already matched). Afterward, reassemble all parts carefully, double-checking bolt tightness and alignment.
Where to Source Honda Tech EK Civic Facelift Parts
You can find these parts from a variety of sources:
- Junkyards or auto recyclers
- Honda Tech forums and Facebook groups
- Online platforms like eBay or specialized JDM parts shops
Make sure to verify the part numbers and condition before purchase. Original (OEM) parts tend to fit better than aftermarket alternatives.
Common Issues and Fixes
Problem: Misaligned Headlights
Solution: Recheck mounting brackets and ensure the radiator support is straight.
Problem: Bumper doesn’t fit snugly
Solution: Use shims or adjust the fender alignment. In some cases, trimming plastic tabs helps.
Problem: Hood won’t close properly
Solution: Adjust the latch mechanism and make sure the hood is seated evenly on both sides.
Real User Feedback from Honda-Tech Forums
Many users on Honda-Tech and other enthusiast communities have successfully done the facelift swap. Some key advice includes:
- Always replace all front-end parts at once instead of mixing prefacelift and facelift pieces.
- Patience is crucial during alignment to ensure clean fitment.
- Investing in OEM parts saves time and trouble during installation.
Conclusion: Final Tips for a Successful EK Facelift
Converting your 1996–1998 Civic into a 1999–2000 facelift model is a rewarding project that can significantly upgrade the car’s appearance. With the right Honda Tech EK Civic facelift parts, attention to detail, and proper installation, your Civic will not only look newer but also stand out in the enthusiast community.
Related Articles
How to Keep Backup Camera On While Driving RV with Jensen CAR8000
Can the 2024 Subaru Crosstrek Reach 7ft 7in Height with Roof Cameras? A Complete Guide