Introduction
The term “Dietz reflector telescope camera lens” can be somewhat misleading. There is no mass-produced telescope under the Dietz name, but rather, some vintage camera lenses—particularly telephoto zoom lenses—have been sold under the Dietz brand.
These lenses can be adapted creatively for telescope-like functionality. Alternatively, users may refer to using a reflector telescope setup with a camera system as a lens substitute for long-distance imaging. In this guide, we address both interpretations to help you understand how to use such equipment effectively.
Telescope Optics vs. Camera Lenses
Reflector telescopes and camera lenses operate on similar optical principles but serve different purposes. A reflector telescope uses a set of mirrors to collect and focus light, making it ideal for distant celestial objects. In contrast, camera lenses incorporate multiple lens elements designed to reduce chromatic and spherical aberrations, optimize sharpness, and produce a flat field of view.
Here’s a comparison for clarity:
| Feature | Reflector Telescope | Camera Lens |
|---|---|---|
| Light collection | High (due to large aperture) | Moderate |
| Focus mechanism | Manual via focuser | Autofocus/manual |
| Aberration control | Needs correctors (coma, field) | Built-in optical correction |
| Image sharpness | Excellent at center | Uniform across field (high-end) |
| Compatibility | Needs adapters for camera | Direct camera mount |
Understanding the Equipment
If you possess a Dietz lens, it is likely a manual zoom telephoto lens, such as a 70–210 mm f/3.8 macro model. These can be adapted for astrophotography but will not offer the same performance as a dedicated telescope. On the other hand, if you’re trying to use a Newtonian reflector telescope as a lens, you’ll need a few accessories to make your camera compatible.
Essentials include:
- A T-ring that matches your camera mount (Canon, Nikon, Sony, etc.)
- A T-adapter that fits into the telescope’s focuser
- Possibly a Barlow lens to achieve focus
- Optional: Field flattener to reduce curvature at the image edges
Setting Up the Dietz Reflector Telescope Camera Lens
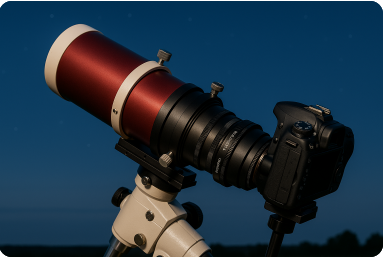
Once you have your components ready, setting up the Dietz reflector telescope camera lens requires careful alignment and attachment. First, attach the T-ring to your camera body. Then connect the T-adapter to the T-ring. Insert the adapter into the telescope focuser in place of the eyepiece. In many cases, the telescope won’t reach focus directly due to back-focus limitations, so you may need to use a Barlow lens or extension tube.
Position your camera on a stable mount or tripod, and use live view (if available) to manually focus on a bright star or distant object. Focus should be adjusted slowly and precisely. If stars look like comets near the edges, you’re seeing coma—common in Newtonian reflectors without a coma corrector.
Performance and Limitations
The Dietz reflector telescope camera lens setup is functional for entry-level astrophotography, especially lunar and planetary imaging. However, deep-sky astrophotography (e.g., nebulae or galaxies) may require a better-corrected optical system.
Common limitations include:
- Coma: Stars near the edge appear stretched
- Field curvature: Outer parts of the image are out of focus when the center is sharp
- Low contrast: Reflector optics can have slightly less contrast than refractors
- Focus challenges: Especially with DSLRs that don’t reach focus without extension or Barlow lenses
Despite these issues, planetary and lunar shots can still be incredibly sharp with proper setup.
Tips for Effective Astrophotography
Getting great results from your Dietz reflector telescope camera lens involves more than just attaching a camera. You must also consider exposure times, ISO settings, and post-processing. For the best experience:
- Use a motorized equatorial mount to track stars as Earth rotates
- Take multiple exposures and stack them using software like DeepSkyStacker
- Use noise reduction tools to clean up the final image
- Collimate your telescope regularly for sharp focus
Upgrade Path and Alternatives
If you enjoy the results from your Dietz setup, you may want to invest in better optics over time. Consider the following upgrades:
| Current Gear | Recommended Upgrade |
| Newtonian Reflector + DSLR | Apochromatic Refractor + Cooled Camera |
| Dietz Zoom Lens | Dedicated Astrophotography Lens |
| Manual Mount | Equatorial Go-To Mount |
Alternatively, you can try compact catadioptric lenses (like mirror lenses), which provide long focal lengths with compact form and moderate cost.
Troubleshooting Common Problems
You might face some hurdles using the Dietz reflector telescope camera lens. Here are common problems and fixes:
- Camera won’t reach focus: Use a Barlow lens or extension tube
- Blurry stars at the edge: Add a coma corrector
- Vignetting (dark corners): Try a focal reducer or crop the image
- Vibrations: Use a remote shutter release or delay timer
Case Study Example
Let’s say you have a 6-inch Newtonian reflector telescope, a Canon DSLR, a T-ring, and a 2x Barlow lens. After attaching all components, you target the Moon. With proper focus and exposure settings (ISO 800, 1/100s shutter speed), you take 10–15 images.
Using stacking software, you blend them and enhance details with contrast and sharpening filters. The result? A crisp, detailed image of the lunar surface showcasing craters, ridges, and shadows—achieved with a beginner-friendly budget setup.
Conclusion
While it may not be a name that dominates the astrophotography world, the Dietz reflector telescope camera lens setup offers a fantastic learning experience for hobbyists and beginners. With careful setup, alignment, and an understanding of its optical behavior, users can capture stunning photos of the night sky. Whether you’re adapting an old Dietz lens or using a reflector telescope as your optical base, the key lies in mastering the tools, not necessarily owning the most expensive gear.
Related Articles
VMC3030-100EUS Netgear Arlo Smart HomeHD Camera Manual – Complete Setup & User Guide
How to Keep the Backup Camera On While Driving with CAR8000 Jensen
Ingrasys Technology Sunnyvale Campus Purchase: A Deep Dive into Foxconn’s $128M Silicon
Rulendfly Global Technologies: Pioneering Innovation Across AI, Cybersecurity, Cloud & IoT Solutions

